Create an Admin Interface in Laravel
Nowadays, you’d be hard-pressed to find a PHP developer who doesn’t know about Laravel. If you are one of these people, visit the Laravel site ASAP! The framework is insanely popular in the PHP community these days because of the thought that has gone into it to make it easy to use and robust as hell! We will demonstrate its easy-of-use by building an admin interface that we can use to manage our users in some fake application we have already built. Let’s do it!
The Files
We need to download the files locally and get our project configs set up. Let’s do this really quick. Run the following command to download the files and all its dependencies. I’m assuming you have composer downloaded globally on your machine.
composer create-project laravel/laravel useradmin
This will create a directory called useradmin, put all of Laravel’s files in it, and then download all of Laravel’s dependencies. Next, we need to fill in our configs. Go into the config files and fill in what’s necessary. I always fill in URL and timezone in app.php and the MySQL info in database.php.
EDIT: Thanks to Triggvy Gunderson for pointing out the following two extra steps to take. You should change the debug option to true when in development to make sure you can see a helpful error screen. Also, make sure to make the app/storage directory writable by executing the following from the root of your project:
chmod -R 777 app/storage
Now that all that initial setup is done, let’s create and seed our database.
The Database
We need to create our database table to hold our users in, and then we will seed it with some data for us to play with. Run the following command to get some boilerplate code written for us to make our table.
php artisan migrate:make create_users_table --create=users
If you go to /app/database/migrations, there will be a new migration file waiting for you. Let’s fill it out.
<?php

use Illuminate\Database\Schema\Blueprint;
use Illuminate\Database\Migrations\Migration;

class CreateUsersTable extends Migration {

	/**
	 * Run the migrations.
	 *
	 * @return void
	 */
	public function up()
	{
		Schema::create('users', function(Blueprint $table)
		{
			$table->increments('id');
			$table->string('username');
			$table->string('email');
			$table->string('password');
			$table->string('first_name');
			$table->string('last_name');
			$table->timestamps();
		});
	}

	/**
	 * Reverse the migrations.
	 *
	 * @return void
	 */
	public function down()
	{
		Schema::drop('users');
	}

}
This is all we need to create our database table! Piece of cake. Now let’s seed the table to give us some fake data to play with later.
<?php

class UserTableSeeder extends Seeder {

	/**
	 * Run the database seeds.
	 *
	 * @return void
	 */
	public function run()
	{
		$vader = DB::table('users')->insert([
				'username'   => 'doctorv',
				'email'      => 'darthv@deathstar.com',
				'password'   => Hash::make('thedarkside'),
				'first_name' => 'Darth',
				'last_name'  => 'Vader',
				'created_at' => new DateTime(),
				'updated_at' => new DateTime()
			]);

		DB::table('users')->insert([
				'username'   => 'goodsidesoldier',
				'email'      => 'lightwalker@rebels.com',
				'password'   => Hash::make('hesnotmydad'),
				'first_name' => 'Luke',
				'last_name'  => 'Skywalker',
				'created_at' => new DateTime(),
				'updated_at' => new DateTime()
			]);

		DB::table('users')->insert([
				'username'   => 'greendemon',
				'email'      => 'dancingsmallman@rebels.com',
				'password'   => Hash::make('yodaIam'),
				'first_name' => 'Yoda',
				'last_name'  => 'Unknown',
				'created_at' => new DateTime(),
				'updated_at' => new DateTime()
			]);
	}

}
Make sure to uncomment the line in DatabaseSeeder.php so that our seed file will actually be called. Lastly, run the following command to run the migrations and then seed the database.
php artisan migrate --seed
The Login Page
Now, we should try to block off the admin area from people who shouldn’t be able to have access. Let’s add the logic for this into our application. Make your routes.php look like the below:
<?php

Route::controller('/', 'HomeController');
That line creates a “controller” route in our application. This means we can create a route by editing our controller, not our routes file. For example, in our HomeController, we could set up a route that is picked up when we send a PUT request to the url /example by making a method called putExample. Let’s get into it. Make your HomeController look like the following:
<?php

class HomeController extends BaseController {

	public function getIndex()
	{
		return View::make('home.index');
	}

	public function postIndex()
	{
		$username = Input::get('username');
		$password = Input::get('password');

		if (Auth::attempt(['username' => $username, 'password' => $password]))
		{
			return Redirect::intended('/user');
		}

		return Redirect::back()
			->withInput()
			->withErrors('That username/password combo does not exist.');
	}

	public function getLogin()
	{
		return Redirect::to('/');
	}

	public function getLogout()
	{
		Auth::logout();

		return Redirect::to('/');
	}

}
Here we are setting up the login routes to display the login form and process it. The getIndex route simply returns a view to display, which we will make in a moment. We then set up a route to handle the input we receive from the login form. It uses the Auth::attempt to login the user. This method is another example of Laravel making our job easier! It tests the given credentials against credentials in the database. The table to use is stated in the auth.php config file. It will automatically log the user in and return true if the user credentials check out. If not, we are redirecting back to the previous page (our login page) with the given input and with an error message to let the user know what’s up. We also create a login route that redirects back to our home page. Lastly, we create a logout route that will log a user out using Laravel’s Auth::logout function and then redirect to our home page.
Now that we have the routes created, let’s create the views. We only need one view for this controller. We need to put it in the app/views/home/ directory. We will call it index.blade.php. Laravel uses the blade template engine, which allows us to keep our views readable but powerful. Put the following code in app/views/home/index.blade.php.
@extends('layouts.master')

@section('title') Login @stop

@section('content')

<div class='col-lg-4 col-lg-offset-4'>

    @if ($errors->has())
        @foreach ($errors->all() as $error)
            <div class='bg-danger alert'>{{ $error }}</div>
        @endforeach
    @endif

    <h1><i class='fa fa-lock'></i> Login</h1>

    {{ Form::open(['role' => 'form']) }}

    <div class='form-group'>
        {{ Form::label('username', 'Username') }}
        {{ Form::text('username', null, ['placeholder' => 'Username', 'class' => 'form-control']) }}
    </div>

    <div class='form-group'>
        {{ Form::label('password', 'Password') }}
        {{ Form::password('password', ['placeholder' => 'Password', 'class' => 'form-control']) }}
    </div>

    <div class='form-group'>
        {{ Form::submit('Login', ['class' => 'btn btn-primary']) }}
    </div>

    {{ Form::close() }}

</div>

@stop
Nothing crazy happening here. We are creating a form that will submit to our route. By default, Laravel forms submit a POST request to the same URL we are on. This is perfect for the way we set up our login routes. At the top, you can see we are extending a layout. Let’s create that too. This is a good practice for making extendable routes in your applications. Use the layouts to create basic templates for your views so your main view files need the least amount of code in them. Layouts usually include the CSS and JavaScript files that are used in all views. Below is the layout I used. It should be in app/views/layouts/master.blade.php.
<!DOCTYPE html>
<html lang='en'>
    <head>
        <meta name='viewport' content='width=device-width, initial-scale=1'>
        <title>@yield('title') | User Admin</title>

        <link rel='stylesheet' href='//netdna.bootstrapcdn.com/bootstrap/3.1.1/css/bootstrap.min.css'>
        <link href="//netdna.bootstrapcdn.com/font-awesome/4.0.3/css/font-awesome.css" rel="stylesheet">
        <style>
            body {
                margin-top: 5%;
            }
        </style>
    </head>
    <body>
        <div class='container-fluid'>
            <div class='row'>
                @yield('content')
            </div>
        </div>
    </body>
</html>
This is a basic layout. It brings in Twitter Bootstrap and Font Awesome just to make our views look pretty. I’m not much of a designer. Bootstrap is my savior!
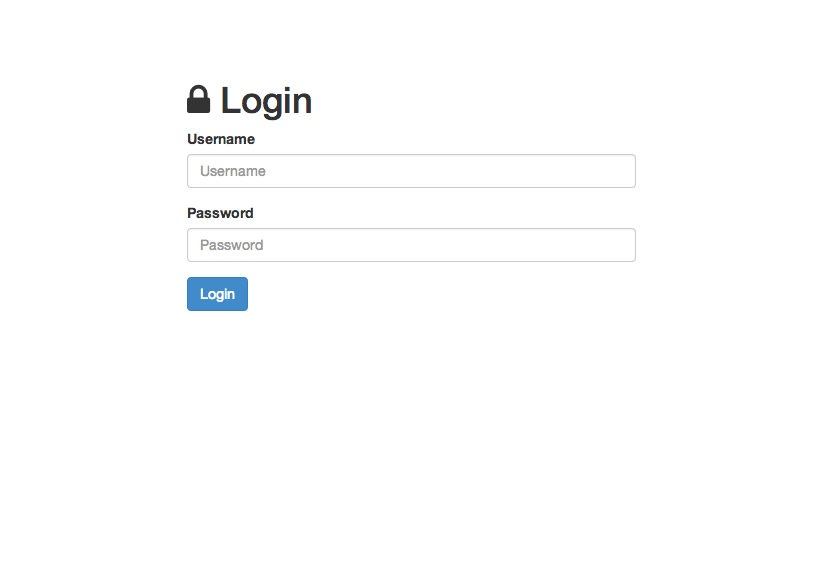
In your browser, navigate to your project. I set up a virtual host for mine. So, I go to http://local.useradmin.com. This loads up the login screen we created. Going great so far. Let’s test that we get an error if we don’t enter valid credentials. Enter anything crazy in the username and password fields and hit enter. You should be taken back to the same page with an error at the top and the username already filled in. Awesome-sauce. Now let’s make sure we can get logged in. Log in with one of the credentials we seeded our database with. I like the Darth Vader one, personally. Hit enter and…wait. What the hell? What’s this error? Well, we haven’t created that route yet. Laravel is kind enough to let us know what we did wrong. So let’s make that now!

This is how the login page should look.
The User Management
Now, we need to make the user management functionality. First, let’s add a convenience method to our User model that we will user in our admin view. Add the following method to your User model.
/**
	 * Get the user's full name by concatenating the first and last names
	 *
	 * @return string
	 */
	public function getFullName()
	{
		return $this->first_name . ' ' . $this->last_name;
	}
This is a method to return a user’s full name. This is just a convenience. I use this in all my projects. Now that we have this, let’s add a route to our routes file to expose our the user controller we will create to our application. Make your routes.php file look like the below.
<?php

Route::resource('/user', 'UserController');
Route::controller('/', 'HomeController');
We added a resource route. This allows us to interact with our controller in a RESTful way. If you don’t know REST, then read up here ! It just standardizes the way we interact with our application. Now, let’s create our controller. Let’s utilize Laravel’s command line utility Artisan and have it create some boilerplate code for us. Run the following command.
php artisan controller:make UserController --except=show
This creates a RESTful controller for us. It can be found in app/controllers. It has all the methods in it we will use. Notice I passed the except option with a value of show. This tells Artisan that we want all the methods in our code except the show method. For our particular use, we don’t need a page just one user. For a better explanation of each of these methods, see the Laravel docs
.
Let’s populate our controller with our functionality. Make it look like the below code.
<?php

class UserController extends \BaseController {

	public function __construct()
	{
		$this->beforeFilter('auth');
	}

	/**
	 * Display a listing of the user.
	 *
	 * @return Response
	 */
	public function index()
	{
		$users = User::all();

		return View::make('user.index', ['users' => $users]);
	}

	/**
	 * Show the form for creating a new user.
	 *
	 * @return Response
	 */
	public function create()
	{
		return View::make('user.create');
	}

	/**
	 * Store a newly created user in storage.
	 *
	 * @return Response
	 */
	public function store()
	{
		$user = new User;

		$user->first_name = Input::get('first_name');
		$user->last_name  = Input::get('last_name');
		$user->username   = Input::get('username');
		$user->email      = Input::get('email');
		$user->password   = Hash::make(Input::get('password'));

		$user->save();

		return Redirect::to('/user');
	}

	/**
	 * Show the form for editing the specified user.
	 *
	 * @param  int  $id
	 * @return Response
	 */
	public function edit($id)
	{
		$user = User::find($id);

		return View::make('user.edit', [ 'user' => $user ]);
	}

	/**
	 * Update the specified user in storage.
	 *
	 * @param  int  $id
	 * @return Response
	 */
	public function update($id)
	{
		$user = User::find($id);

		$user->first_name = Input::get('first_name');
		$user->last_name  = Input::get('last_name');
		$user->username   = Input::get('username');
		$user->email      = Input::get('email');
		$user->password   = Hash::make(Input::get('password'));

		$user->save();

		return Redirect::to('/user');
	}

	/**
	 * Remove the specified user from storage.
	 *
	 * @param  int  $id
	 * @return Response
	 */
	public function destroy($id)
	{
		User::destroy($id);

		return Redirect::to('/user');
	}

}
That’s alot. I’ll walk through this kind of quickly for the sake of brevity. At the top, I create a construct method for our controller. This will be fired each time or controller is created. I used the beforeFilter method in it. This will fire the given filter whenever this controller is created. For this particular case, I only want to make sure the user is logged in. This filter is supplied to us by Laravel out of the box. If a user is not logged in, it will send them to the /login page. This is why we created the login route in our HomeController that redirects to our homepage. Otherwise we would get an error.
In the index, we get all our users and pass them to our main view. The create method displays the form to add a new user. The store method grabs the input given in the request and saves the user to the database. The edit method grabs the user specified in the URL and sends that user to the view to be edited. The update method grabs the user and updates its attributes. Then saves the changes and redirects back to the main user screen. Lastly, the destroy method destroys the user specified in the URL and then redirects to the main user screen.
The only thing left is to make our views. Let’s do it. The first one should be our main index page. Let’s put it in app/views/user/index.blade.php.
@extends('layouts.master')

@section('title') Users @stop

@section('content')

<div class="col-lg-10 col-lg-offset-1">

    <h1><i class="fa fa-users"></i> User Administration <a href="/logout" class="btn btn-default pull-right">Logout</a></h1>

    <div class="table-responsive">
        <table class="table table-bordered table-striped">

            <thead>
                <tr>
                    <th>Name</th>
                    <th>Username</th>
                    <th>Email</th>
                    <th>Date/Time Added</th>
                    <th></th>
                </tr>
            </thead>

            <tbody>
                @foreach ($users as $user)
                <tr>
                    <td>{{ $user->getFullName() }}</td>
                    <td>{{ $user->username }}</td>
                    <td>{{ $user->email }}</td>
                    <td>{{ $user->created_at->format('F d, Y h:ia') }}</td>
                    <td>
                        <a href="/user/{{ $user->id }}/edit" class="btn btn-info pull-left" style="margin-right: 3px;">Edit</a>
                        {{ Form::open(['url' => '/user/' . $user->id, 'method' => 'DELETE']) }}
                        {{ Form::submit('Delete', ['class' => 'btn btn-danger'])}}
                        {{ Form::close() }}
                    </td>
                </tr>
                @endforeach
            </tbody>

        </table>
    </div>

    <a href="/user/create" class="btn btn-success">Add User</a>

</div>

@stop
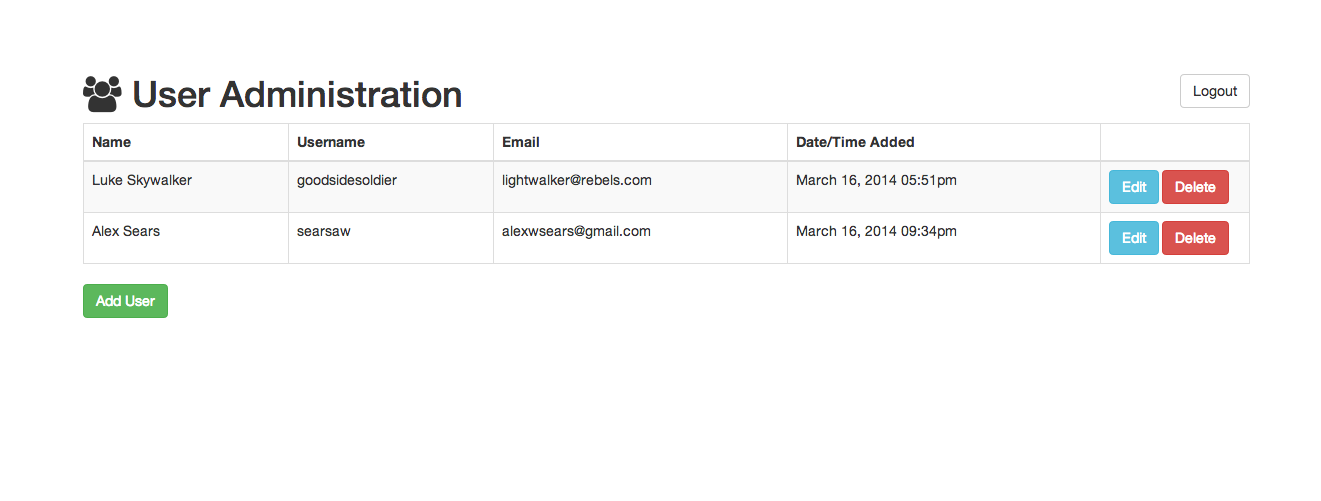
Again, we are extending our master layout. We are creating a table and using a foreach loop to iterate over each user that was passed into the view from the controller. We are outputting each of the attributes we keep in the database minus the password. We are also outputting two buttons – one to edit the user and one to delete them. Notice the edit button is just a link but the delete button is actually a form. This is because we need to send a delete request to our controller. This will ensure the destroy method is called. Because browsers don’t support the PUT or DELETE methods of forms, Laravel adds a hidden attribute to the form that lets the application know we are wanting to use the DELETE method. Also, notice we are using our helper method to output the user’s full name. We output a button after the table to add a new user. Lastly, we put a table at the top to logout. Alot of functionality for such a small file, huh?

This is how the main admin page should look.
Now, let’s build our new user form. This is simple.
@extends('layouts.master')

@section('title') Create User @stop

@section('content')

<div class='col-lg-4 col-lg-offset-4'>

    @if ($errors->has())
        @foreach ($errors->all() as $error)
            <div class='bg-danger alert'>{{ $error }}</div>
        @endforeach
    @endif

    <h1><i class='fa fa-user'></i> Add User</h1>

    {{ Form::open(['role' => 'form', 'url' => '/user']) }}

    <div class='form-group'>
        {{ Form::label('first_name', 'First Name') }}
        {{ Form::text('first_name', null, ['placeholder' => 'First Name', 'class' => 'form-control']) }}
    </div>

    <div class='form-group'>
        {{ Form::label('last_name', 'Last Name') }}
        {{ Form::text('last_name', null, ['placeholder' => 'Last Name', 'class' => 'form-control']) }}
    </div>

    <div class='form-group'>
        {{ Form::label('username', 'Username') }}
        {{ Form::text('username', null, ['placeholder' => 'Username', 'class' => 'form-control']) }}
    </div>

    <div class='form-group'>
        {{ Form::label('email', 'Email') }}
        {{ Form::email('email', null, ['placeholder' => 'Email', 'class' => 'form-control']) }}
    </div>

    <div class='form-group'>
        {{ Form::label('password', 'Password') }}
        {{ Form::password('password', ['placeholder' => 'Password', 'class' => 'form-control']) }}
    </div>

    <div class='form-group'>
        {{ Form::label('password_confirmation', 'Confirm Password') }}
        {{ Form::password('password_confirmation', ['placeholder' => 'Confirm Password', 'class' => 'form-control']) }}
    </div>

    <div class='form-group'>
        {{ Form::submit('Login', ['class' => 'btn btn-primary']) }}
    </div>

    {{ Form::close() }}

</div>

@stop
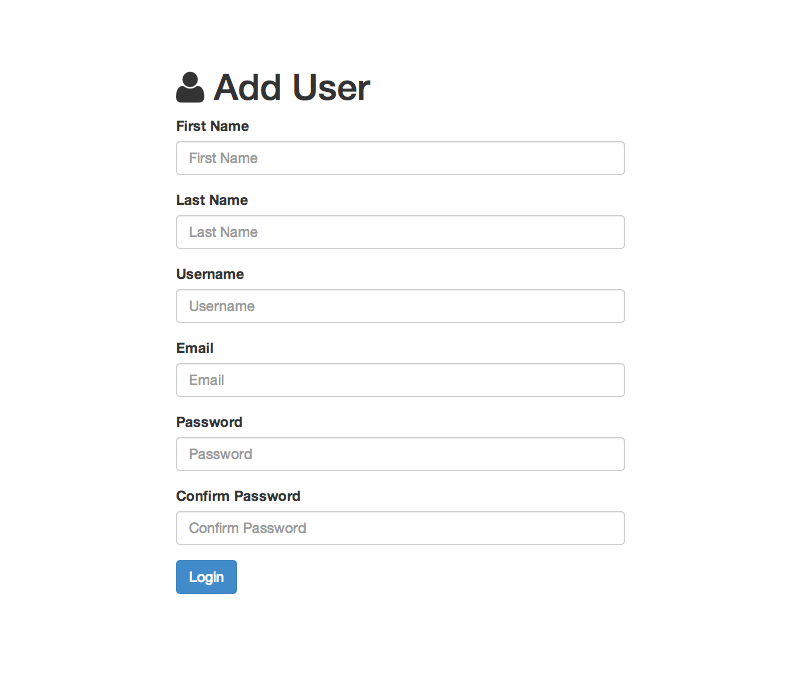
The code in this file should look very familiar. It looks just like our login form except there are more fields in it. Also, we had to overwrite the URL our form submits to. To stick with the RESTful interface, we need to submit a POST request to /user.

This is how the add user page should look.
Lastly, let’s make the form to edit a user.
@extends('layouts.master')

@section('title') Create User @stop

@section('content')

<div class='col-lg-4 col-lg-offset-4'>

    @if ($errors->has())
        @foreach ($errors->all() as $error)
            <div class='bg-danger alert'>{{ $error }}</div>
        @endforeach
    @endif

    <h1><i class='fa fa-user'></i> Edit User</h1>

    {{ Form::model($user, ['role' => 'form', 'url' => '/user/' . $user->id, 'method' => 'PUT']) }}

    <div class='form-group'>
        {{ Form::label('first_name', 'First Name') }}
        {{ Form::text('first_name', null, ['placeholder' => 'First Name', 'class' => 'form-control']) }}
    </div>

    <div class='form-group'>
        {{ Form::label('last_name', 'Last Name') }}
        {{ Form::text('last_name', null, ['placeholder' => 'Last Name', 'class' => 'form-control']) }}
    </div>

    <div class='form-group'>
        {{ Form::label('username', 'Username') }}
        {{ Form::text('username', null, ['placeholder' => 'Username', 'class' => 'form-control']) }}
    </div>

    <div class='form-group'>
        {{ Form::label('email', 'Email') }}
        {{ Form::email('email', null, ['placeholder' => 'Email', 'class' => 'form-control']) }}
    </div>

    <div class='form-group'>
        {{ Form::label('password', 'Password') }}
        {{ Form::password('password', ['placeholder' => 'Password', 'class' => 'form-control']) }}
    </div>

    <div class='form-group'>
        {{ Form::label('password_confirmation', 'Confirm Password') }}
        {{ Form::password('password_confirmation', ['placeholder' => 'Confirm Password', 'class' => 'form-control']) }}
    </div>

    <div class='form-group'>
        {{ Form::submit('Login', ['class' => 'btn btn-primary']) }}
    </div>

    {{ Form::close() }}

</div>

@stop
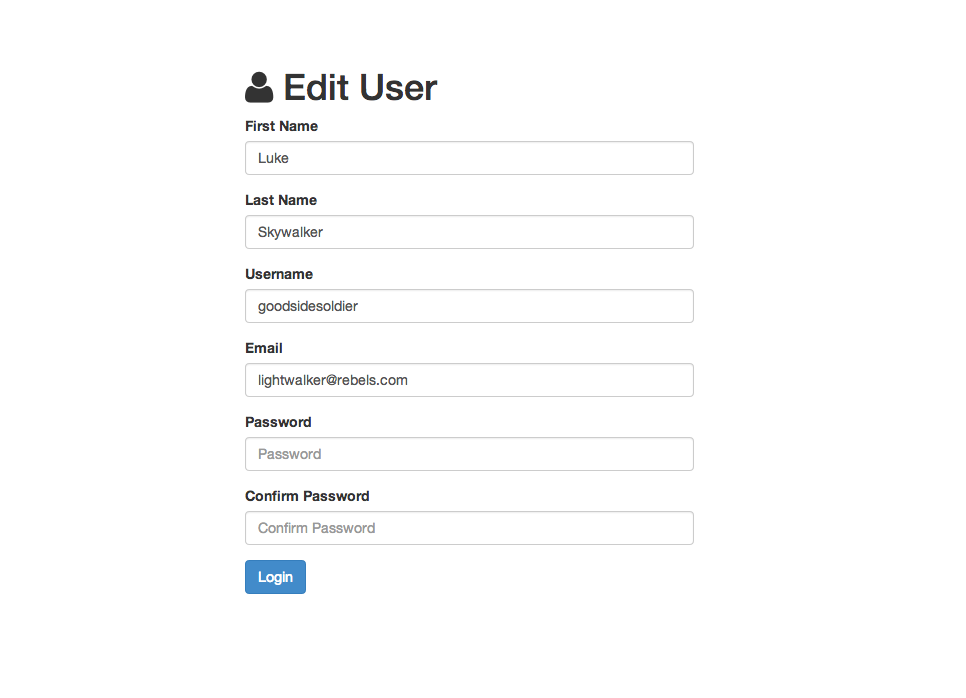
This form is almost exactly the same as the add user form. On this form, we have to overwrite the URL is submits to and also the method it uses. We want this one to submit a PUT request. We also use the model form method instead of the open method. This method does the same thing as the open method except we supply it with a user and it fills in the fields for us by default. This is perfect for an edit form. Thanks Laravel!

This is how the edit user page should look.
Wrapping Up
As you can see, Laravel makes doing common tasks super easy! One thing we should add to this is roles and permissions. We need a way to keep unauthroized users from access our user admin page. Right now, any signed-up user can access it. That isn’t very secure. To add roles and permissions to your project, see my other posts, Adding Roles to Laravel Users and Using Entrust to Add Roles and Permissions to Laravel 4 , and check out my Laravel package Drawbridge . If this has wet your appetite for Laravel, check out the docs. It’s a great system to understand since it is the most popular right now. Leave a comment if you liked the article or just want to say, “Hi!”