User Friendships in Laravel
Facebook has friends. Twitter has followers. LinkedIn has connections. A staple of a social media site is the ability to let people connect with other user in some way. It’s not very social if people aren’t interacting. Adding this to a website isn’t that difficult. It just takes some thought into what that relationship looks like on a database level.
You have users who want to connect with other users. Those users can connect with multiple other users who are also connected to many users. This sort of relationship is called a “self-referencing many-to-many relationship.” If that means nothing to you, that’s okay. It just means entries on a table have a many-to-many relationship with other entries on that same table.
To demonstrate this, let’s build a small application I have dubbed “Club Laravel.” It will be a simple admin screen that people can use to follow other people. This will be a relationship similar to Twitter. People can follow other people without needing the other person to agree to follow them back. Nothing too crazy going on here, but the concepts of a self-referencing many-to-many relationship should make more sense by the end.
All the code discussed here can be downloaded from the Github repo for this post .
Setup
Let’s quickly setup our project. Execute the following on the command line to initialize a project.
composer create-project laravel/laravel club-laravel
cd club-laravel
chmod -R 777 app/storage
This will create a new Laravel project using Composer, move you into the created directory, and make the storage directory fully writable. Make sure to change your database settings in app/config/database.php and turn on debugging in app/config/app.php.
The Database
We now need to setup our database. This means creating the migrations that will make our tables and using seeds to populate our database with some example data to play test the functionality.
Let’s start with the migrations. Run the following commands in your terminal of choice (iTerm2 for me :) ) .
php artisan auth:reminders-table
php artisan auth:reminders-controller
php artisan migrate:make CreateUsersTable --create=users
php artisan migrate:make CreateFriendsUsersTable --create=friends_users
The first two commands won’t be used in this application, but I felt it’s not something that isn’t spoken of enough. I hate setting up password reminders in applications. I’m not sure why. It’s more monotonous than anything. Anywhoooo…Laravel will generate a default one for us that works well for most applications. The first two commands create a migration for the table used by the controller created in the second command to send email reminders to people who need it. The controller command also outputs the route code that you need to add to your routes file to make the application aware of your controller. Thanks Laravel!
The next two commands create a blank migration for the users table and the friends_users table. Go into app/database/migrations and open these two files up. Put the code below into the correct file. This will allow us to generate the table we need for this application.
<?php

use Illuminate\Database\Schema\Blueprint;
use Illuminate\Database\Migrations\Migration;

class CreateUsersTable extends Migration {

  /**
   * Run the migrations.
   *
   * @return void
   */
  public function up()
  {
    Schema::create('users', function(Blueprint $table)
    {
      $table->increments('id');
      $table->string('email');
      $table->string('first_name');
      $table->string('last_name');
      $table->string('password', 60);
      $table->rememberToken()->nullable();
      $table->timestamps();
    });
  }

  /**
   * Reverse the migrations.
   *
   * @return void
   */
  public function down()
  {
    Schema::drop('users');
  }

}
<?php

use Illuminate\Database\Schema\Blueprint;
use Illuminate\Database\Migrations\Migration;

class CreateFriendsUsersTable extends Migration {

  /**
   * Run the migrations.
   *
   * @return void
   */
  public function up()
  {
    Schema::create('friends_users', function(Blueprint $table)
    {
      $table->integer('friend_id')->unsigned();
      $table->integer('user_id')->unsigned();

      $table->foreign('user_id')->references('id')->on('users');
      $table->foreign('friend_id')->references('id')->on('users');

      $table->primary(array('user_id', 'friend_id'));
    });
  }

  /**
   * Reverse the migrations.
   *
   * @return void
   */
  public function down()
  {
    Schema::drop('friends_users');
  }

}
The code is pretty vanilla query builder code. However, I wanted to demonstrate some more “advanced database” stuff when I created the friends_users table. I added a foreign key to each of the columns on that table. In simple terms, this means the database will help me with some validation by making sure that the entries we insert into this table actually exist in another table. So, if we have four users in our users table but try to insert a column that references a fifth user, the database won’t allow it to be inserted. I also added a primary composite key index to the both the columns. This means the combination of users can only exist once in this table. As an example, see the diagram below.
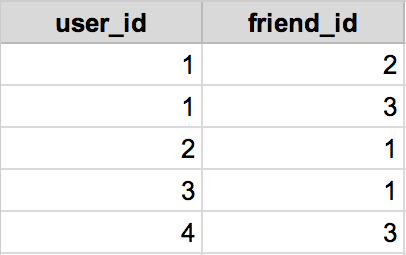
This is how our friends_users table should look at this point.
Above shows a sample of what our friends_users table could look like at some point. A bunch of people are following each other and such. As you can see, there are no duplicate entries. Rows one and three contain the same IDs. However, they are not in the same columns. They are in alternate columns. So this is allowed. However, if we tried to add an entry that said user four wants to be friends with user three, the database wouldn’t allow the entry to be inserted since that entry already exists (row five).
Now that you have a handle on that, let’s create some seeds to give us some data to play with. Create the file UsersTableSeeder.php in app/database/seeds and add the following code to it.
<?php

class UsersTableSeeder extends Seeder {

	/**
	 * Run the database seeds.
	 *
	 * @return void
	 */
	public function run()
	{
		Eloquent::unguard();

		User::create(array(
			'email' => 'alexwsears@gmail.com',
			'first_name' => 'Alex',
			'last_name' => 'Sears',
			'password' => Hash::make('alexsears')
		));

		User::create(array(
			'email' => 'george@foreman.com',
			'first_name' => 'George',
			'last_name' => 'Foreman',
			'password' => Hash::make('georgeforeman')
		));

		User::create(array(
			'email' => 'tony@thetiger.com',
			'first_name' => 'Tony',
			'last_name' => 'Tiger',
			'password' => Hash::make('tonytiger')
		));

		User::create(array(
			'email' => 'fred@flintstone.com',
			'first_name' => 'Fred',
			'last_name' => 'Flintstone',
			'password' => Hash::make('fredflintstone')
		));
	}

}
There is nothing special going on here; just your garden variety seeding of a database. Let’s move on to the user model!
The User Model
Laravel ships with a User model that we can build on. We need to setup the relationships on it and add a few convenience methods we will use later. Open up app/models/User.php and make it look like the code below.
<?php

use Illuminate\Auth\UserTrait;
use Illuminate\Auth\UserInterface;
use Illuminate\Auth\Reminders\RemindableTrait;
use Illuminate\Auth\Reminders\RemindableInterface;

class User extends Eloquent implements UserInterface, RemindableInterface {

	use UserTrait, RemindableTrait;

	/**
	 * The database table used by the model.
	 *
	 * @var string
	 */
	protected $table = 'users';

	/**
	 * The attributes excluded from the model's JSON form.
	 *
	 * @var array
	 */
	protected $hidden = array('password', 'remember_token');

	public function getFullName()
	{
		return $this->first_name . ' ' . $this->last_name;
	}

	public function friends()
	{
		return $this->belongsToMany('User', 'friends_users', 'user_id', 'friend_id');
	}

	public function addFriend(User $user)
	{
		$this->friends()->attach($user->id);
	}

	public function removeFriend(User $user)
	{
		$this->friends()->detach($user->id);
	}

}
First, we define the users table as the table to hold our users. Laravel would do this mapping by default, but I find it nice to explicitly name it just to prevent random errors or something. It’s not necessary for those trying to keep their codebase small. Next, I create a getter method to get a user’s full name. It is a convenience method that concatenates the first and last name together. This makes displaying it easier in our views. We also create two convenience methods that add or remove a user from a specified user’s followers. Putting these in the model will improve the readability of our dashboard controller once we make it.
There is also a method above that allows us to get all the friends a user has attached to them. We designate this a belongs-to-many relationship since this is how we let Eloquent (the Laravel ORM
) know that there is a many-to-many relationship between two models. The first argument is the class of the model we are connecting our current model to. In this case, it is a self-referencing relationship. So we give it the string 'User'. Next, we tell it the table that the entries should be kept on ('friends_users'). Many people may feel you should name this for the type of relationship there is between the two models. In this case, we could call that table 'friendships', but I decided to stick with the Laravel convention. This means that you concatenate the two lowercase plural model names together with an underscore in alphabetical order. This is a special case since it’s self-referencing. We have to give the user model a different name in one part of the relationship. So, since a user has many friends, the table name has ‘friends’ in it and has 'friend_id' as an attribute on it. The third argument is the foreign ID in the given table that references the current entry, which is the 'user_id'. The last argument is the foreign key of the related model. I just explained the logic behind its name. So we supply the last argument as 'friend_id'. In some cases, you may not need to supply all these arguments to a relationship method call like this one. It all depends on if you are following Laravel conventions. You can read more about this on the Laravel docs about Eloquent relationships
.
Now let’s setup the authorization!
The Authorization
I’m not going to spend much time on the code here. It’s basic authorization in Laravel. For a better explanation of what’s going on, read my other post Create an Admin Interface in Laravel .
Add the following to your routes file (app/routes.php). Make sure it is the last entry in the file.
// Create auth routes
Route::controller('/', 'HomeController');
Next, make your HomeController look like the following. This will create the functionality for logging in and logging out.
<?php

class HomeController extends BaseController {

	public function getIndex()
	{
		return View::make('home.index');
	}

	public function postIndex()
	{
		$email = Input::get('email');
		$password = Input::get('password');
		if (Auth::attempt(array('email' => $email, 'password' => $password))) {
			return Redirect::intended('dashboard');
		}

		return Redirect::to('/')
			->withInput()
			->withErrors('That username/password combo does not exist.');
	}

	public function getLogout()
	{
		Auth::logout();

		return Redirect::to('/');
	}

}
Create the file at app/views/layouts/master.blade.php and put the following code in it. I am using the Zurb Foundation 5 framework for the front-end prettification. If you are unfamiliar it, check out their docs
.
<!DOCTYPE html>
<!--[if IE 9]><html class="lt-ie10" lang="en" > <![endif]-->
<html class="no-js" lang="en" >
<head>
<meta charset="utf-8">
<meta name="viewport" content="width=device-width, initial-scale=1.0">
<title>Club Laravel</title>
<link rel="stylesheet" href="css/normalize.css">
<link rel="stylesheet" href="css/foundation.min.css">
<style>
body {
margin-top: 5%;
}
</style>
<script src="js/vendor/modernizr.js"></script>
</head>
<body>
<div class="row">
<div class="medium-10 medium-offset-1 columns">
<h1>Club Laravel</h1>
</div>
</div>
@if ($errors->has())
@foreach ($errors->all() as $error)
<div class='alert-box alert' data-alert>
{{ $error }}
<a href="#" class="close">×</a>
</div>
@endforeach
@endif
<div class="row">
<div class="medium-10 medium-offset-1 columns">
@yield('main')
</div>
</div>
<script src="js/vendor/jquery.js"></script>
<script src="js/foundation.min.js"></script>
<script>
$(document).foundation();
</script>
</body>
</html>
Lastly, create the file at app/views/home/index.blade.php and put the following code in it.
@extends('layouts.master')

@section('main')

  {{ Form::open() }}

  {{ Form::label('email', 'Email') }}
  {{ Form::text('email') }}

  {{ Form::label('password', 'Password') }}
  {{ Form::password('password') }}

  {{ Form::submit('Login', array('class' => 'button')) }}

  {{ Form::close() }}

@stop
Sweet! Now you should have a functioning login interface. If you log in with one of the emails and password we seeded our database with, you will notice we get an error. It should be something along the lines of “the route ‘dashboard’ doesn’t exist.” That’s because we haven’t made it yet! So let’s do that now!
The Dashboard
This one I will go through a bit slower. We want to create a page for users to view users they are following, view friends they are not following, start following someone, and stop following someone. This may sound like alot, but we can do all this in a single page very simply because of the setup we have already created.
First, let’s add our route to the routes file so that our application knows where to route requests to the dashboard. Add the following to your routes file.
// Create dashboard route
Route::controller('dashboard', 'DashboardController');
Let’s create that controller. We have to manually create it since our controller will not be a “resourceful” controller. Create the file app/controllers/DashboardController.php and insert the following code into it.
<?php

class DashboardController extends BaseController {

  public function getIndex()
  {
    $not_friends = User::where('id', '!=', Auth::user()->id);
    if (Auth::user()->friends->count()) {
      $not_friends->whereNotIn('id', Auth::user()->friends->modelKeys());
    }
    $not_friends = $not_friends->get();

    return View::make('dashboard.index')->with('not_friends', $not_friends);
  }

}
This along with the code in our routes files will allow users to go to /dashboard. We also get all the people who are not the logged in user’s friends by first getting all the users who are not the logged in user. Then , if the user has friends, it will add to the query that we should not select the users who are already friends with the logged in user. Then we execute the query. Lastly, we pass this variable to the view so we can use it there.
Let’s create the view that displays all this. Create the file at app/views/dashboard/index.blade.php and insert the following code into it.
@extends('layouts.master')

@section('main')

  <h2 class="subheader">Friends</h2>
  <table style="width:100%;">
    <thead>
      <tr>
        <th>Name</th>
        <th>Email</th>
        <th></th>
      </tr>
    </thead>
    <tbody>
      @foreach (Auth::user()->friends as $friend)
      <tr>
          <td>{{ $friend->getFullName() }}</td>
          <td>{{ $friend->email }}</td>
          <td><a href="#">Remove friend</a></td>
      </tr>
      @endforeach
    </tbody>
  </table>

  <h2 class="subheader">Other People</h2>
  <table style="width:100%;">
    <thead>
      <tr>
        <th>Name</th>
        <th>Email</th>
        <th></th>
      </tr>
    </thead>
    <tbody>
      @foreach ($not_friends as $friend)
      <tr>
          <td>{{ $friend->getFullName() }}</td>
          <td>{{ $friend->email }}</td>
          <td><a href="#">Add friend</a></td>
      </tr>
      @endforeach
    </tbody>
  </table>

  <p class="right"><a href="/logout">Logout</a></p>

@stop
Here we are extending our master layout. We create the header for a table and then iterate over the user’s friends and display them. We put a link at the end to remove the person as a friend. However, it won’t work right now. We will get to that in a moment. Then, we iterate through the $not_friends variable we created before and put a link at the end to add the user as a friend. Again, though, it does not work just yet.
Log in and view the dashboard. You will be able to see you don’t have any friends. Let’s add this functionality now!
Adding Friends
To add this functionality, we need to add a method to our controller. Add the code below to your DashboardController.
public function getAddFriend($id)
{
  $user = User::find($id);
  Auth::user()->addFriend($user);
  return Redirect::back();
}
The url to hit this method would be /dashboard/add-friend/(id). This code finds the user supplied in the url. It then adds the user as a friend to the logged in user using the addFriend() method we added to our User model earlier. We end by redirecting back to the previous page, which in this case is our dashboard page.
The functionality is now working. If you were to manually go to each URL, it would work fine, but that doesn’t make for a very usable application. We need to make our links work. Replace the “Add friend” table cell with the code below.
<td>{{ link_to_action('DashboardController@getAddFriend', 'Add friend', array('id' => $friend->id)) }}</td>
Boom! That’s it. Now the links will allow you to make someone a friend. Note that this is only a one way relationship. The other person is not required to be your friend back. This sort of relationship would operate the same but would require more logic.
Removing Friends
The last thing to do is to allow users to remove other users as friends. This will require the same sort of changes as when adding friends. First, we add a method to our DashboardController.
public function getRemoveFriend($id)
{
  $user = User::find($id);
  Auth::user()->removeFriend($user);
  return Redirect::back();
}
This works similarly to adding a friend except it uses the removeFriend() method instead. Now all that’s left is to change the remove friend button to create the correct URL to send our users to when they click it. Replace the remove friend button with the code below.
<td>{{ link_to_action('DashboardController@getRemoveFriend', 'Remove friend', array('id' => $friend->id)) }}</td>
Wham bam! It’s done. You now have the ability to add and remove friends from a logged in user. To see this in action, log in as different users and add and remove friends. Adding and removing them only affects the user you are currently logged in as.
Wrapping Up
Some database concepts can be confusing to picture. However, once you have your head wrapped around what is going on, implementing it in Laravel is a cinch. Thanks Laravel! Leave a comment with any questions or just to say, “Hi!”